


The groundhog saw his shadow which suggests six more weeks of winter. In many places, like ski resorts out west, they can only hope to get snow the recoup for a seasonably small amount of snow.
Given the extra weeks of winter, we thought we would get crafting and start thinking of warmer weather and beach vacations.
We found an abundance of Sand Dollars at Sea Island Georgia this winter break, we are making Three Sand Dollar Crafts To Remind You of Your Beach Vacation. Which sea shell decoration will you make first?
(Obviously you can use any seashells you find but we just loved our Sand Dollar Find)
How to Preserve Sand Dollars.

STEPS TO USE SHELLS FOR CRAFTING
First and foremost you want to harden your sand dollars for crafting. While bleaching and drying out in the sun works, I researched by painting the sand dollars with a mixture of water and school glue the sand dollars will be more sturdy.
First things first, we bleached and sun-bleached our sand dollars while still in Florida and once we got back to Richmond, we painted them with the glue mixture.
How to make Sand Dollar Ornaments
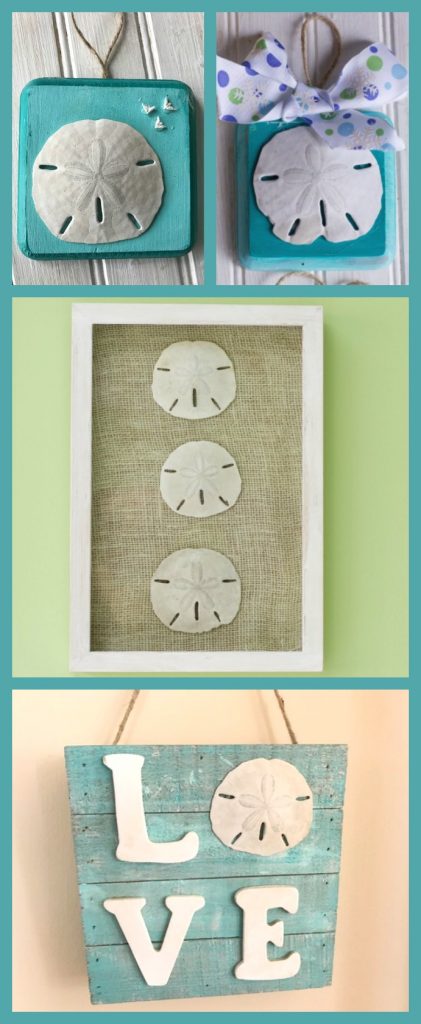
One of our family traditions is to buy ornaments from the places we have visited. Well, this year, we used Sand Dollars to create our Sea Island Ornaments.
While the sand dollars dried, we painted inexpensive blocks of wood in beach turquoise colors. Simple enough, don’t you think?

Simply, hot glue a piece of cording to the back of the wood.

Turn them over and hot glue your preserved sand dollar. Add some festive ribbon too.

On one of our shell ornaments, we used the inside of a broken sand dollar. The little “birds” if you will add a different look to one of the ornaments.


HOW TO MAKE SEA SHELL DECORATIONS: CRATE SIGNS

We found an inexpensive CRATE and decided to paint it a beach color as well. We used a paper towel to remove some of the paint to make it more muted and natural looking.

Paint wooden Letters L, V, & E in white. Allow to dry and you have an adorable LOVE sign that will forever remind you of the beach.

What you need to make Shell Shadow Boxes
–Shadow box frames – This one already has fabric on it
–Burlap in desired colors
-Shells
–Modge Podge Glue
This by far was the favorite of my shell crafts. We have a large wall in our bathroom with an adorable beach photo, yet the wall still appears bare.

The Shadowbox frames we found, were a dull cream color. We added some white paint to brighten them up.
Remove the backing of the frames and cut out a piece of burlap a little wider and longer than the backing.

Using Modge Podge glue, adhere to the burlap as flatly as possible. We found that adding glue to the front of the burlap took out some of the wrinkles. Allow to Dry Completely.

Once the burlap is dry, hot glue your Sand Dollars to the Burlap
Return the backing into the frame and secure the notches.

Hang and admire the beach! with these seashell decorations that are simple and inexpensive to make!

I can’t wait for the warmer weather and a chance to hit the beach again.
Pin these Sand Dollar Crafts so you can replicate them after you return from the beach.

0 Comments